Tuesday, 12 May 2009

How To Send An E-Mail Using ASP.NET

May 12, 2009 0
Sending an E-mail from your web site is really simple with ASP.NET. First of all will look at what actually happened when an E-mail is sending from a web site. First step is preparing your complete E-mail programmatically. For that you need to set source e-mail address, destination e-mail address, e-mail subject, e-mail body, SMTP (Simple Mail Transfer Protocol) mail server and SMTP port of your server. Once you prepare your E-mail in correct format, there is only one step to send the E-mail to your destination addresses. For that you need to pass the E-mail request to message queue of the SMTP server through SMTP port. By default port 25 is used as mailing port. That is only what you have to do and rest of the relaying of E-mail part will handle by the SMTP server itself. SMTP server is responsible to pass your E-mail to respective destinations.

System.Net.Mail namespace should import using following code.

using System.Net.Mail;

Code for prepare your E-mail format is as follows.

// System.Web.Mail.SmtpMail.SmtpServer is obsolete in 2.0
// System.Net.Mail.SmtpClient is the alternate class for this in 2.0
SmtpClient smtpClient = new SmtpClient();
MailMessage message = new MailMessage();

MailAddress fromAddress = new MailAddress(fromAdd, displayName);

// You can specify the host name or ipaddress of your server
// Default in IIS will be localhost
smtpClient.Host = "smtpsvr";

//Default port will be 25
smtpClient.Port = 25;

//From address will be given as a MailAddress Object
message.From = "fromadd@yourdomain.com";

// To address collection of MailAddress
message.To.Add("toadd@yourdomain.com";);

message.Subject = "Your E-mail subject";

// CC and BCC optional
// MailAddressCollection class is used to send the email to various users
// You can specify Address as new MailAddress("admin1@yoursite.com")
//message.CC.Add("ccadd1@yourdomain.com");
//message.CC.Add("ccadd2@yourdomain.com");

// You can specify Address directly as string
//message.Bcc.Add(new MailAddress("bccadd1@yourdomain.com"));

//Body can be Html or text format
//Specify true if it is html message
message.IsBodyHtml = false;

// Message body content
message.Body = "Your E-mail message contents";

// Send SMTP mail
smtpClient.Send(message);

Monday, 11 May 2009

How To Set Session Timeout in Web.config

May 11, 2009 0
Session timeout period can be set as you required simply changing web.config file of your web site. In ASP.NET web site once you add web.config file you can find tag. Inside this tag you can specify session timeout value. Add following code to your web.config file.

<system.web>
<sessionstate timeout="60"/>
</system.web>

In this example you have set sessionState timeout value to 60 minutes. You can change this value as you wish, but need to make sure that it is really required. For example if you set a very large value for timeout, your session will hang on forever in the server. This will lead some security issues, memory overflow issues and sometime unexpected behaviour of your web site. And also this value should not be very small values. For example if you have functions like uploading files in the web site, then you should give enough time to upload a file based on the size of the file, network traffic and bandwidth limitation of the client machine.

Sunday, 10 May 2009

New Blog Site for Power Electronics and Robotics

May 10, 2009 0
I lanched a new blog site for discuss about power electronics and robotics related topics. This site is intended to publish deep theoritical articles and practically implementations of power electronics and robot world.

http://www.elecsl.blogspot.com/

Identity Columns in DB2 AS/400

May 10, 2009 0
Does DB2 support for identity columns? Yes, it is. All numeric data types in DB2 database support for identify columns. Identity columns means, a field or column in a database table which automatically set its values for a new row insert. You don't need to provide value for the identity field when you insert new row into your table. For example if you want to set your customer identification number grow like 1000,1001,1002,1003... , you can set customer identification number column as identity column and starting number 1000 and increment value is 1. Then when you insert next customer it will increase the maximum customer identification number by 1 and automatically insert into the table.

You can find iSeries Navigator from "Start -> IBM iSeries Access for Windows -> iSeries Navigator". Open iSeries Navigator and select your database and table that you need insert identity column. Keep in mind that you can only set identity only for numeric fields. You can either create new table with identity columns or set identity property for existing table.
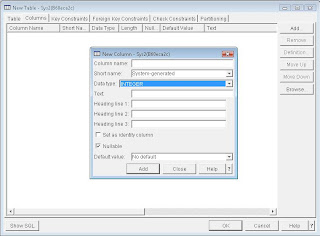
Fig 1: Insert New Column with Identity
In Table go to Column tab and click on Add button to add new column. Specify column name, short name, data type text...etc. If you select numeric data type for you column you will see a check box "Set as identity column". Tick that check box to enable identity for this column. Once you check the check box it will expand the window which allow you to configure the identity settings.
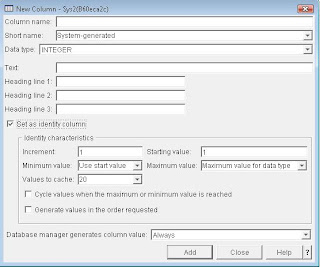
Fig 2: Set as Identity Column

Set Increment to an any value that you want increment your identity value. If you set 1 here it will increase the existing maximum number by 1. Starting value is used to set increase first row. Minimum value and Maximum value are used to restrict the values to a particular range. Values to cache is used to load last maximum values to memory so that increase the maximum value by Increment value is not needed a database hit for read maximum value for the identity column. "Cycle values when the maximum or minimum value is reached" check box is used to set whether the repetative value range is necessary when the datatype is reached its maximum or minimum values. This option is not allowed if you have set the column as primary or unique key for the table. "Generate the values in the order requested" check box is used to set whether you need to set values for the column in order or not. For example if you delete any value in between the value range whether that value is reusable or not.
Once you set any column as identity you don't need to give values when you insert a record into table. This column will automatically will be filled by the DBMS itself.

Wednesday, 6 May 2009

Manage SQL Tables in IBM iSeries Navigator

May 06, 2009 0
IBM iSeries Navigator is a rich client tool to work with DB2 database in AS400 machines. From your Microsoft Windows client machines through iSeries Navigator you can connect to remotely located DB2 database and work with it as simple as work in Microsoft Access database. You don't need work with console or do lot of coding which always lead to errors. Using iSeries Navigator you can very quickly develop you database and manage it very effectively.

Login

First step is to login to AS400 machine through iSeries Navigator. You need to provide server name, user id and password.


Fig 1: Login iSeries Navigator

Once you successfully login to the system in "Environment" pane it will list down all the entities that you can manage through iSeries Navigator UI. This list will vary based on the access permission to the connected AS400 server. In this article will discuss on how to work with SQL tables through the Navigator. At the end of the article you will realize how you can save your time by using iSeries Navigator for database management rather working on console window.

Work with SQL tables in DB2 database through navigator you need to select "Databases" section. Under Databases section you will have Schemas, Database Navigator Maps, SQL Performance Monitors, SQL Plan Cache Snapshots and Transactions.


Fig 2: Databases in iSeries Navigator

Under schemas section it will list down all the database schemas or different databases in the server. Database Navigator Maps is a graphical tool to visualize the database design. It is shown database tables, constraints and relationships or references in graphical notations. Database Navigator Maps can be used to manage your database as well. SQL Performance Monitors can be used to monitor and fine tune the database design. Transactions section shows Database Transactions and Global Transactions.

Select Schemas to Display
Expand the Schemas section to see the database you have already in the server. If it not listed your particular database you can add that database to navigator by using "Select Schemas to Display" option. Right click on the Schemas and select "Select Schemas to Display".

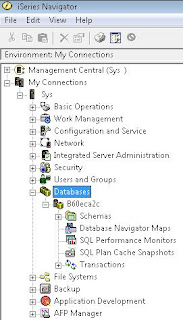
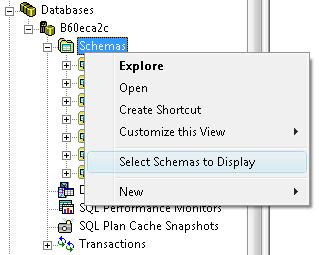
Fig 3: Select Schemas to Display
Enter the schema name or search for a schema that you want to show in the navigator using "Select Schemas toDisplay" window. Add the schema to "Selected Schemas" list and click Ok.

Fig 4: Select Schemas to Display Window


Create New Schema
If you want to create a new database or schema, right click on Schemas and select "New -> Schema". Specify a name for the new schema, whether it needs to add to displayed list of schemas and create as standard library. "Create in" is the system pool that you want to create your database in. "Text" is to discribe shortly your database for operator's purpose.


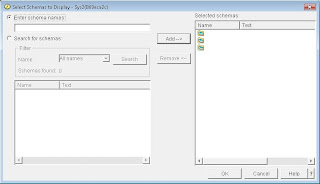
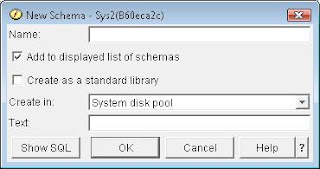
Fig 5: New Schema Window

Create New Table
Once your database schema is listed under Schemas section, select the database that you want to work with. It will display all objects belong to the selected database such as aliases, constraints, distinct types, functions, indexes, journal receivers, journals, procedures, sequences, SQL packages, tables and views. Select "Tables" from the tree view and right hand side pane will display all the tables in the database. Right click on Tables and select "New -> Table" to create new table in the database.
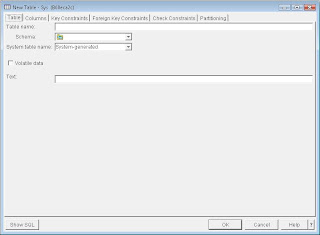
Fig 6: Create New Table Window

In New Table window specify the table name, schema and system table name and text. System table name is used to identify the table in the system. Text is to describe the table purpose. Use "Volatile Data" check box if the table need to be volatile.
Add Column to Table
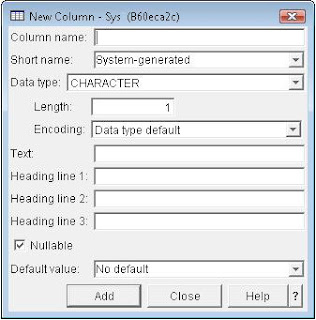
Fig 7: Create New Column Window
Specify Column name, Short name for system purposes, Data type, Text and Heading for new column. Data type drop down list shows all the data types that you can use for your purpose. Click "Add" once you enter all the details to add the column into table.

Tuesday, 5 May 2009

IBM iSeries Navigator

May 05, 2009 0
DB2 is one of the most popular Database Management System developed by IBM. DB2 is heavily used in various high end applications around the world on mainly AS400 platform. High security, higher performance, easy maintenance and backup/recovery procedure of DB2 are key factors to lead the industry. Even though DB2 is very powerful database management system, it was not very user friendly at early stages. Basically console based programming was required. Most of the users came from Microsoft Windows operating system background don't like to work on console and write everything manually. They always expect some graphical tool to make easy their work. IBM iSeries Navigator full fill this gap effectively and nowadays iSeries Navigator is heavily used desing and program database. Work with iSeries navigator is realy simple as work with Microsoft SQL server UI. iSeries Navigator is client tool that is allowed to work with your DB2 database remotely from your PC. Installing iSeries Navigator is really simple on Microsoft Windows operating system.
You can find iSeries Navigator from "Start -> IBM iSeries Access for Windows -> iSeries Navigator".
Fig 1: Open iSeries Navigator

iSeries Navigator is stand alone windows application which will facilitate almost all the services that can perform in DB2. This is very rich tool but most of the people are still not used effectively.

Fig 2: iSeries Navigator UI

iSeries Navigator main UI containts four major sections and a menu bar. Menu bar is not a complex one and any person can easily work with. Top left hand corner section called "Environment" section and it list down all the entities and services that you can use based on your permission level. Top right hand corner section shows the details for the selected entity of the environment section. "My Tasks" section list down all the possible tasks that can perform at DB2 server level. This list is not unique for all users and will vary based on the permission level that user have. "Environment Tasks" section list down all the task that can perform for the selected environment in environment section.

Common functions listing that can perform using iSeries Navigator is as follows:

  • Design and Create Databases
  • Create Database Schemes
  • Create Tables, Views, Stored Procedures, Functions, Indexes, Triggers and Journals
  • Create Users, User Groups and manage them
  • Manage Security
  • Basic Operations such as Messages, Printer Output, Printers and Jobs
  • Work Management - Manage Jobs, Queues, Subsystems and Memory Pools
  • Network Configuration
  • File System
  • Backup Policies
  • Application Developments

Will discuss one by one further in future articles.

Monday, 4 May 2009

Import/Export SSL Security Certificates in IIS

May 04, 2009 0
We discussed how to enable SSL in a web site and create your own self-signed security certificate. Also you can use exsisting security certificates for a same server and same domain. You can use "Import" and "Export" facilities in Actions pane of Server Certificates window.
Open IIS Manager browsing Start -> Control Panel -> Administrative Tools -> Internet Information Services (IIS) Manager or run "inetmgr" command. Click on "Server Certificates" icon in middle pane of IIS manager.
Click on "Server Certificates" icon.

Fig 1: Server Certificates Icon


Select your existing certificate from Server Certificates window. Once you select your certificate it will show few new links in Actions pane to Export the certificate.

Fig 2: View, Export or Remove links


View link is for view details of the selected certificate, Export link for export the selected certificate and if you no more required selected certificate you can click on Remove link to remove certificate from the server.


Fig 3: Export Certificate Window

Browse the location that you want to save your certificate at "Export to:" and provide a password for this file to secure the certificate containts from unauthorized users. You need to provide same password when you import the certificate back.
Click on "Import" link and browse your certificate file to import.

Fig 4: Server Certificate Window

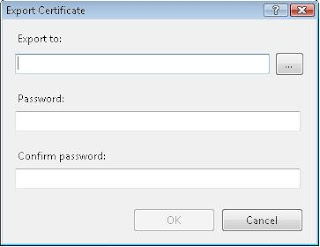
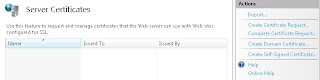
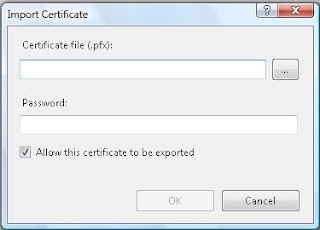
Fig 5: Import Certificate Window

Sunday, 3 May 2009

Create Self-Signed Certificates in IIS

May 03, 2009 0
While you have freedom to use security certificate from third part organization, for simple applications you can use self-signed certificates in IIS. With self-signed security certificates there is no third party is involved for certification or validation process. You can generate self-signed certificate in IIS (Internet Information Services) Manager and use the same for your HTTPS enabled or secure site. Open IIS Manager browsing Start -> Control Panel -> Administrative Tools -> Internet Information Services (IIS) Manager or run "inetmgr" command. Click on "Server Certificates" icon in middle pane of IIS manager.

Fig 1: Server Certificates Icon
Click on "Self-Signed Certificate" link in Actions pane.

Fig 2: Server Certificate Pane


Specify the friendly name for your certificate in "Create Self-Signed Certificate" window and click Ok.


Fig 3: Create Self-Signed Certificate
Finally you can bind the generated self-signed certificate to your secure SSL site by using "Bindings" link in actions pane for a selected web site.